
Services and storefront
Package what you offer and sell it from your storefront.
Beyond campaigns, you can sell video services directly to brands. This page covers building your service list, publishing your public storefront, and tracking the orders and promotions that follow. Set up your services first, then publish your storefront so brands have somewhere to find and book them.
Services
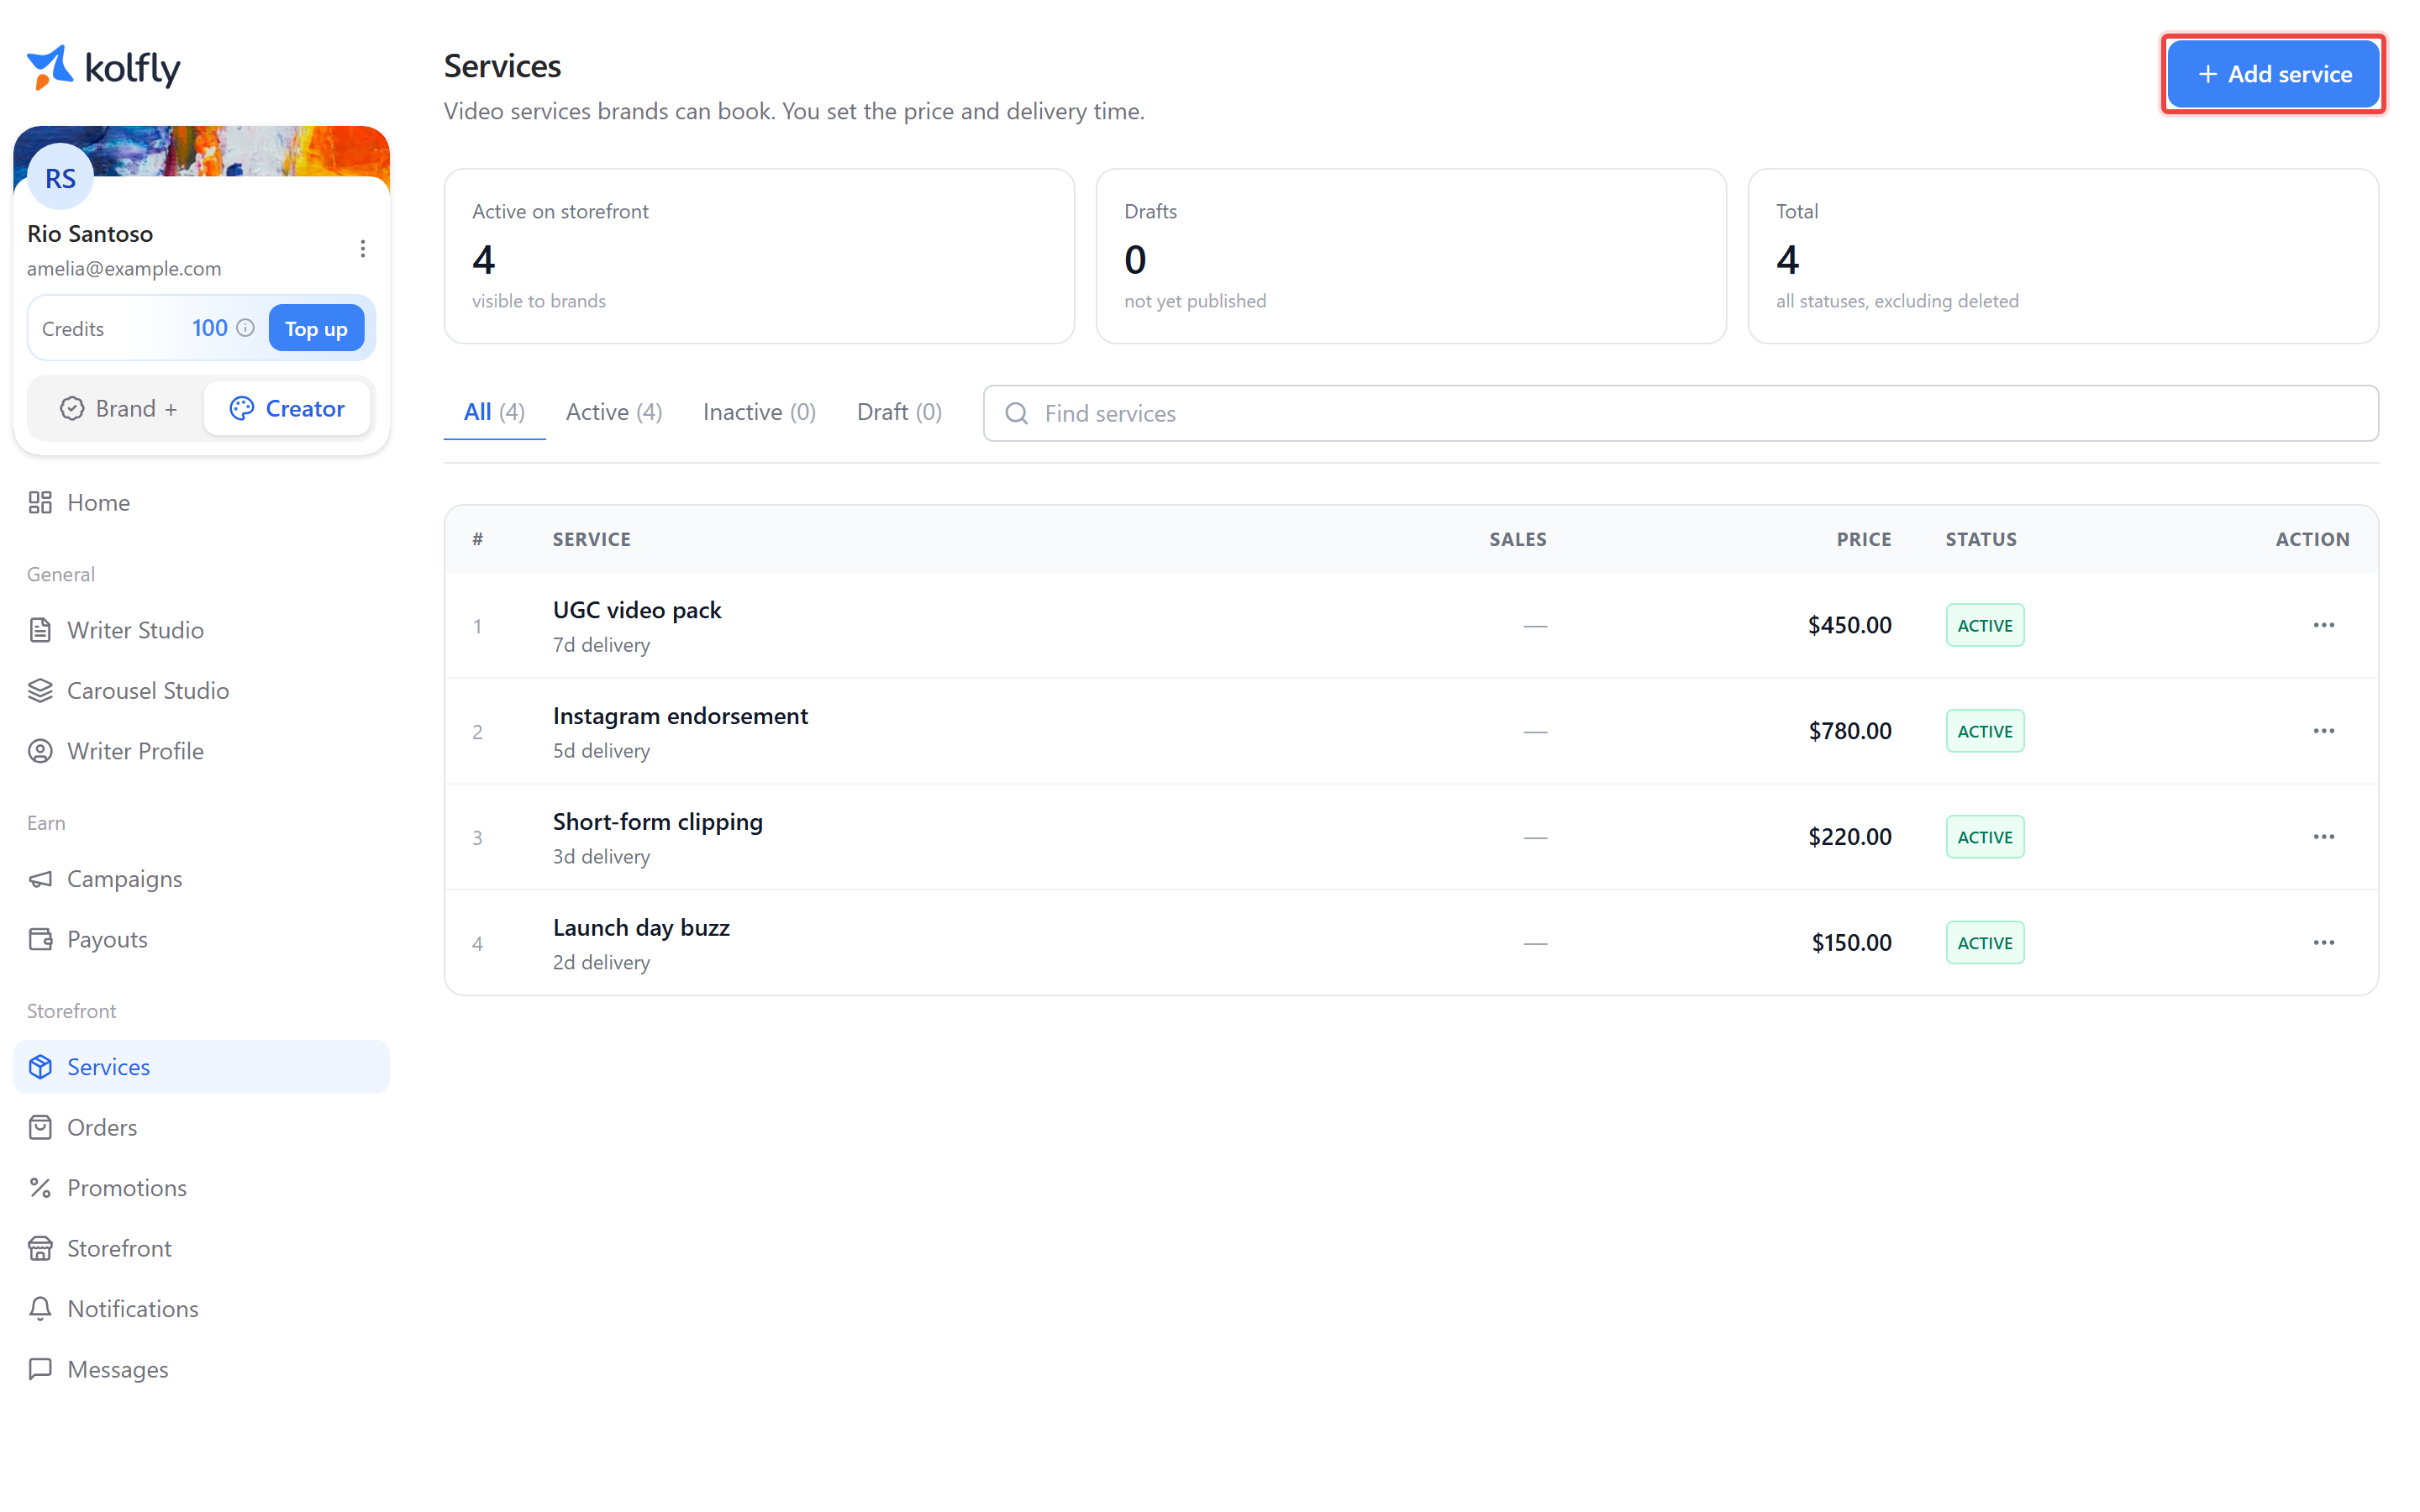
Services, at /creator/monetize/packages, is where you define the video services brands can book. The header reads "Video services brands can book. You set the price and delivery time."
A stat strip at the top shows Active on storefront, Drafts, and Total. Below it, status tabs let you filter your list: All, Active, Inactive, Draft. A search box, "Find services", narrows the list further.
Select Add service to create a new one.
Creating a service
The Category for every service is fixed to Video — you can't change it. Service is a dropdown with four types:
- Buzzer video
- Clipping
- Endorsement
- UGC video
You can list each type only once. Types you already offer are disabled in the dropdown so you can't create a duplicate. Once you offer all four types, the page tells you: "You already offer every available service. Edit an existing one, or archive it to create a new version with different terms." If you want to change your terms for a type you already offer, edit the existing listing rather than trying to add a second one.
Each service type has a fixed name and description set by Kolfly. You control the commercial terms:
| Field | What it sets |
|---|---|
| Price | What you charge |
| Currency | USD or IDR |
| Turnaround (days) | How long delivery takes |
| Scope note | A free-text description, up to 280 characters (placeholder: "e.g. Max 60s video, 1 revision round, delivered in 9:16") |
| Thumbnail & media | Up to 5 images, with one chosen as the cover |
| Showcase portfolio | Up to 10 images of past work |
| Availability | Tick No limit availability, or set Available from and Available until dates |
When you're done, select Save as draft to keep working on it later, or Save & publish to make it live.
Managing a service
Each row in your service list has these actions:
- Set Active / Set Inactive: toggles whether the service is bookable.
- Hide from Profile: removes it from your public storefront. This action is only available while the service is Active.
- Edit: change any field.
- Share: copies your public storefront link for that service. This is blocked if the service is hidden or your storefront isn't ready yet.
- Delete: permanently removes the service. A confirmation notes that existing order history is preserved even after deletion.
Use Set Inactive rather than Delete to pause a service temporarily, since deleting it removes the listing for good.
The Sales column currently shows a dash for every row.
Storefront
Storefront, at /creator/manage/storefront, is your public bio-link page. The header reads "Your public bio-link page." Your page lives at a /c/ address built from your chosen slug.
A status chip shows whether your storefront is Draft or Published. Next to it, an Open live button appears once published, or a Preview button while it's still a draft.
Publishing your storefront
While your storefront is unpublished, a banner reads "Draft. Not public yet." with the note "The preview on the right updates as you edit. Publish when ready." Select Publish when you're ready to make it public.
Editing your storefront
The editor sits on the left of the page, with a live preview on the right that updates as you type. You can edit:
- Your Display name, up to 120 characters.
- Your Storefront profile photo.
- A theme for the page's look.
- Whether the Products and Links tabs show on your public page.
Changing your slug
If you change your storefront's slug, the old slug keeps redirecting visitors to your new one for 30 days. This gives anyone with your old link, including brands who bookmarked it, time to find your updated address before the redirect stops working.
Orders
Orders, at /creator/monetize/orders, tracks every transaction tied to your services, from new orders through delivery and payout. The header reads "Track every transaction tied to your products, from new orders through delivery and payout."
A stat strip shows New, In progress, Delivered, and Completed counts. Tabs let you filter: All, New, In progress, Delivered, Completed, Issues. A search box, "Find by buyer name or email…", helps you locate a specific order.
An order moves through these statuses: PENDING_PAYMENT, PAID, IN_PROGRESS, DELIVERED, COMPLETED, CANCELLED, REVISION_REQUESTED, DISPUTED.
Promotions
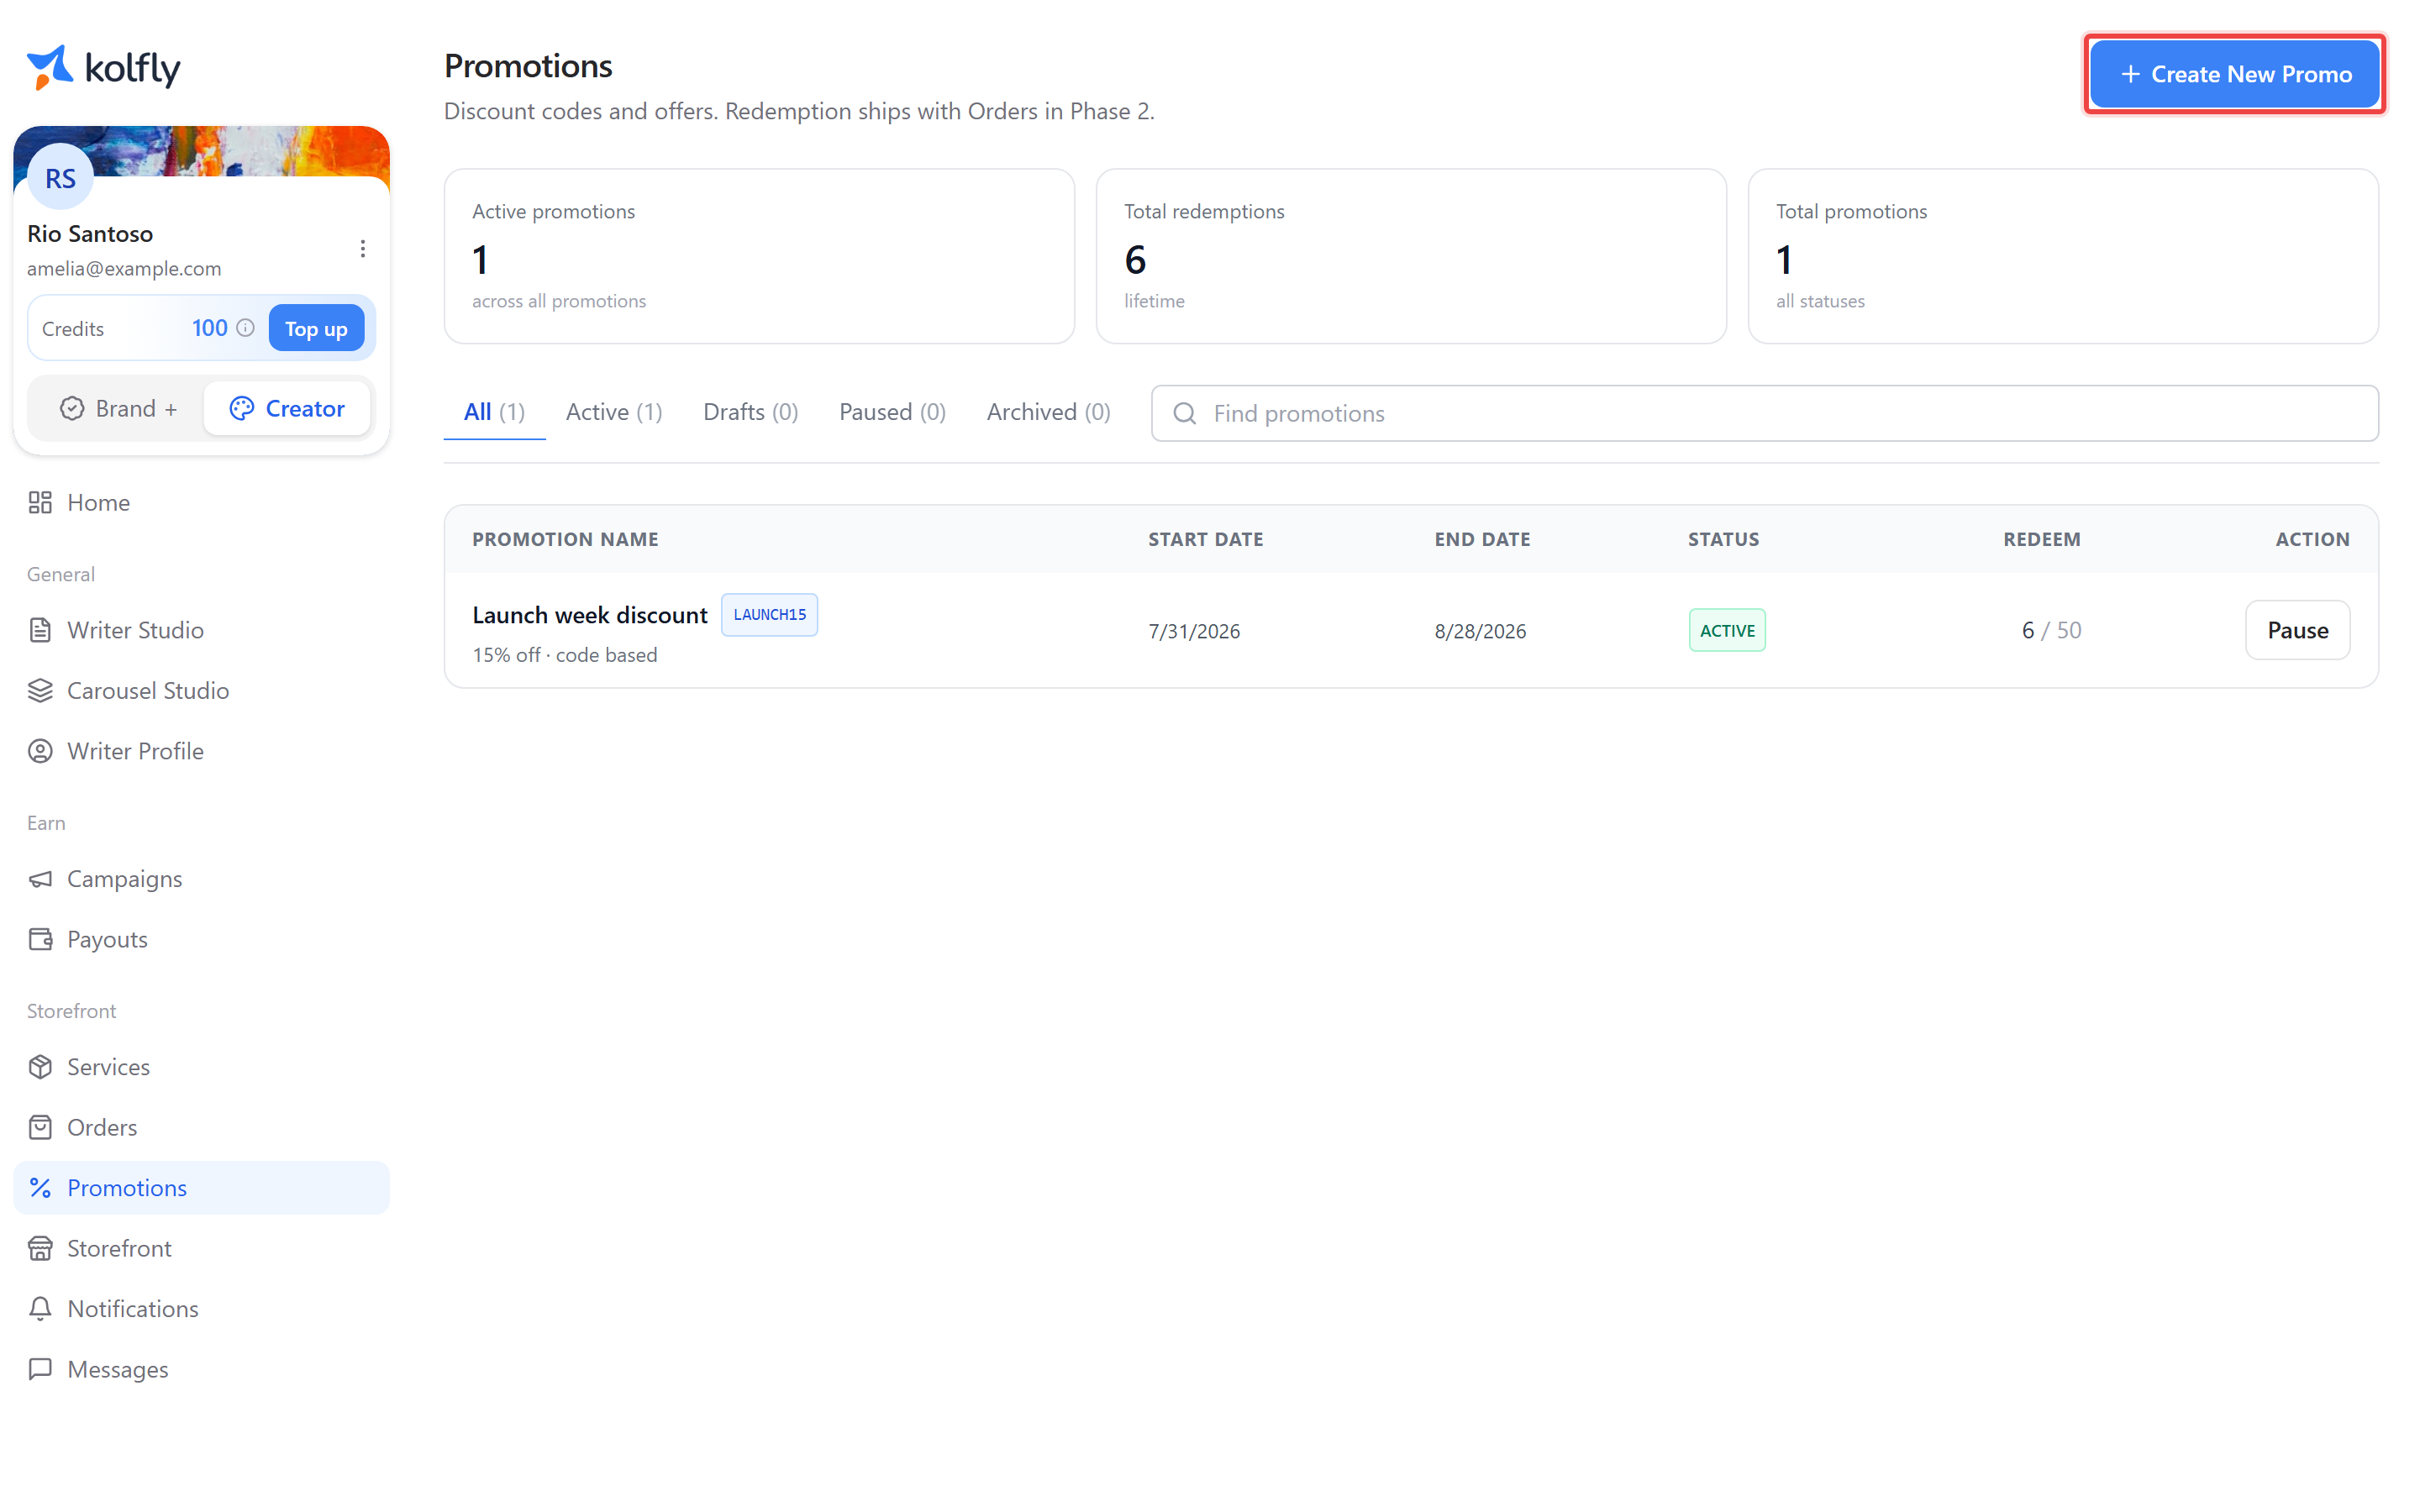
Promotions, at /creator/monetize/promotions, lets you build discount offers for your services. Select Create New Promo and choose one of three types: Code-based, Auto-apply, or Bundle offer.
A promotion starts as Draft. Select Activate to make it Active, then use Pause and Resume to control it while it's live. Archived is a final state you can't undo.
Separately, a status chip shows the promotion's effective state: Active, Scheduled, Paused, Expired, or Archived.
Discount redemption at checkout is not yet available. The Promotions page itself states that redemption ships in a later phase. You can build and organize promotions now, setting up codes, auto-apply rules, and bundles ahead of time, but they do not yet apply at checkout for buyers. Treat this as preparation for a feature that's coming, not as something live today.